
Make Your Own Face Mask

Its crazy to think 6 months ago, the idea of us living in a world where wearing face coverings was mandatory was absurd! Fast forward to today and it's now the new normal.
Fabric face coverings are a fantastic option as they are much better for the environment than the disposable ones, plus you can be as creative as you like! If you are new to sewing like me, making your own face covering is a great way to gain confidence with the added bonus of being able to now understand some of the sewing terminology which previously baffled me.
The most important thing to remember when creating a face covering is that it should cover your nose and mouth. This is a very basic step by step method taken from the Gov website. There are lots of variations including pleated masks, masks with filter pockets and masks with nose wires for a more snug fit but this is the method I found the easiest to follow as a beginner.
Things you will need:
1.) Your choice of fabric (100% cotton fabric such as a cotton poplin is a great option as it is breathable)
Cotton Poplin Collection (Click here to view)
2.) Elastic (6mm/1/4” elastic or hat elastic is a comfortable option)
1/4'' Elastic (Click here to view)
3.) Scissors (the sharper the better)
Dressmaking Scissors (Click here to view)
4.) Needle and thread (if you have a sewing machine, you may wish to use this instead as it will make the mask more durable)
Hand/Machine Needles (Click here to view)
The steps to making a Face Mask
1. Firstly, cut your fabric into two 25cm x 25cm squares. Two layers of fabric is currently recommended by the government and there are so many brilliant prints to choose from on our website

2. Place one piece of fabric on top of the other, making sure the face sides of the fabric is facing outward
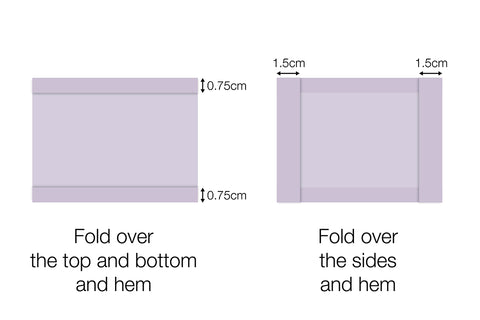
3. Fold the top and bottom edge inwards by 0.75cm and sew along the edge of the fold to hold in place. Fold the left and right side inwards by 1.5cm and stitch down, leaving enough space to thread the elastic through
4. Thread the elastic through the two wider sides of the fabric. You can use a large needle to thread the elastic through

5. Tie the elastic to create the ear loops, making it tighter or looser for your individual comfort. Make sure the knots are situated in the hem so they are not visible

6. Finally, stitch the elastic so it stays in place and does not slide.
And there you have it, your completed face mask. Simply wear, wash and repeat.
Happy sewing.
Credit UK Gov Website - https://www.gov.uk/government/publications/how-to-wear-and-make-a-cloth-face-covering/how-to-wear-and-make-a-cloth-face-covering